 Pin it
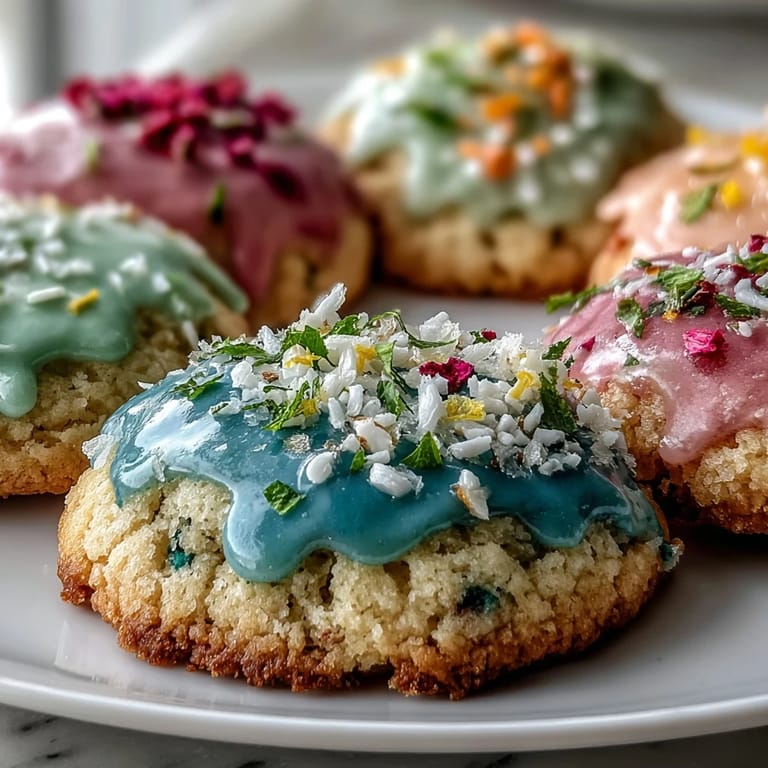
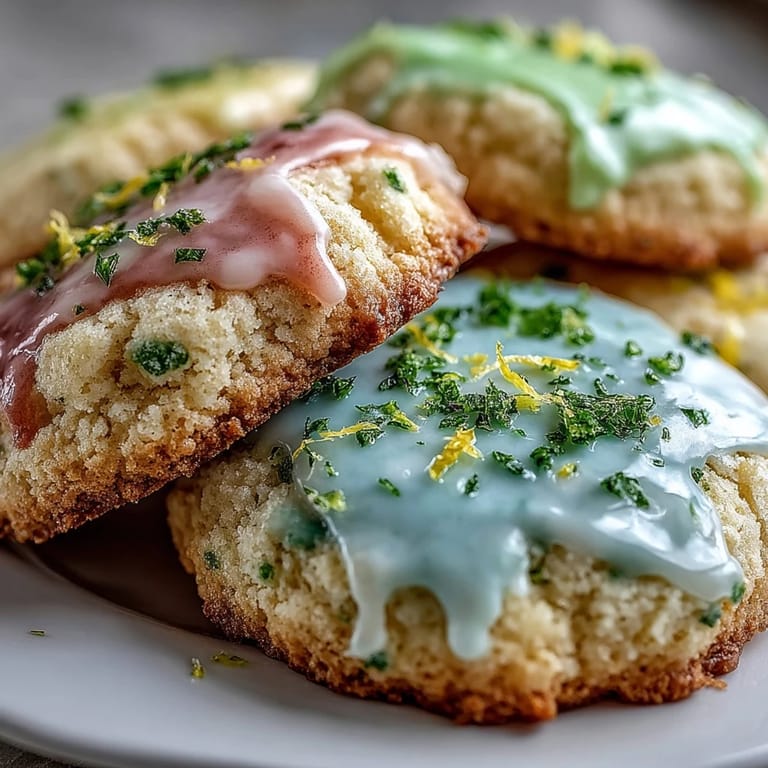
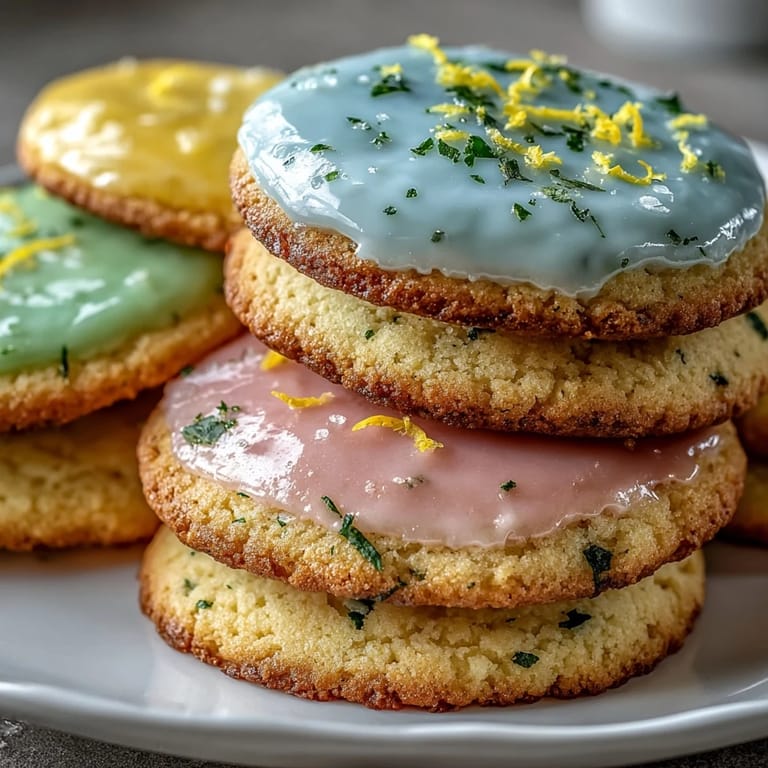
 The zing of lemon and the sight of pastel glaze splattered across the kitchen counter still remind me of that one Saturday I set out to make these spring cookies. I could hear the birds chirping from the open window, and the scent of freshly grated lemon zest seemed to brighten the entire room. The dough was as soft as a pillow, and for once, I wasn’t rushing—each step felt like a tiny celebration. Baking these cookies became a ritual I look forward to every time spring rolls around. There's something uniquely cheerful about their colors and flavors.
I remember making these for a small garden party last spring, and the kitchen was filled with laughter as we debated which pastel shade was the prettiest. Someone dropped a spoonful of pink glaze on the floor, and even that became part of the fun — proof that cookies aren't meant for perfection. The batch disappeared before the daffodils had a chance to droop, and the lemony aroma made its way outdoors. That evening, a friend asked for the recipe, insisting it became her new spring tradition. The cookies seemed to bring everyone together, whether through decorating or devouring.
Ingredients
- All-purpose flour: Gives structure without heaviness, and I always sift it for a lighter crumb.
- Baking powder: Just enough to give these cookies a gentle lift; don't skip it or they'll be flat.
- Fine sea salt: Balances sweetness and makes the lemon pop — a pinch is all you need.
- Unsalted butter (softened): Room-temperature butter blends smoothly and creates delicate cookies; I leave mine out for at least half an hour before starting.
- Granulated sugar: Essential for sweetness and texture, and beating it with butter yields those signature airy cookies.
- Large egg: Binds everything and adds a touch of richness; fresh eggs always make better cookies.
- Fresh lemon juice: Brings natural zest and tartness, making each bite burst with spring flavor.
- Finely grated lemon zest: I use a microplane and scrape just the bright yellow for the most aroma.
- Pure vanilla extract: Rounds out the lemon and adds depth; real vanilla is worth the splurge here.
- Powdered sugar (sifted): The glaze is smooth only if the sugar isn't lumpy — always sift before mixing.
- Milk (whole or 2%): Adjusts the glaze's thickness and makes it velvety; add gradually so you don't over-thin it.
- Fresh lemon juice (for glaze): Adds tang to the icing, tying the flavors together beautifully.
- Food coloring (pastel pink, blue, yellow, or green): A drop goes a long way, and I always start with less to keep the hues gentle and spring-like.
Tired of Takeout? 🥡
Get 10 meals you can make faster than delivery arrives. Seriously.
One email. No spam. Unsubscribe anytime.
Instructions
- Preheat & Prepare:
- Turn on your oven to 350°F (175°C) and line two baking sheets with parchment. The anticipation grows as the kitchen warms up.
- Mix Dry Ingredients:
- In a medium bowl, whisk flour, baking powder, and salt together. Watch for the flour to fluff up and smell just a bit nutty.
- Cream Butter & Sugar:
- In a large bowl, beat the softened butter and sugar until it's pale and airy—about 2–3 minutes. The more you whip, the lighter your cookies will be.
- Add Wet Ingredients:
- Stir in the egg, lemon juice, lemon zest, and vanilla. The mixture turns silky and fragrant, like a cloud of citrus.
- Combine Dry & Wet:
- Add the dry mixture gradually, stirring gently. The dough should be soft and only just combined—over-mixing makes cookies tough.
- Scoop & Shape:
- Drop tablespoon-sized balls onto the sheets, spacing them out so they don't crowd. Press them gently with your palm or the bottom of a glass until slightly flattened.
- Bake:
- Bake for 10–12 minutes, watching for golden edges. Let the cookies cool on the tray for 5 minutes, then transfer to a wire rack to finish.
- Make the Glaze:
- Whisk powdered sugar, milk, and lemon juice until smooth and glossy. Adjust milk a little at a time if the glaze feels too thick or thin.
- Color & Glaze:
- Divide the glaze into bowls and stir in pastel food coloring. Dip or drizzle onto completely cooled cookies for a whimsical finish.
- Set & Serve:
- Let glaze set for 20 minutes before serving. The cookies are ready for spring celebrations or a quiet snack.
 Pin it
 We once ended up decorating these cookies late at night, and the kitchen table became a canvas for all our pastel experiments. It turned into a mini art session, hands sticky with glaze, and laughter echoing as someone accidentally made a turquoise cookie that looked nothing like spring but tasted just as delightful. Suddenly, the cookies weren't just dessert — they were tiny, edible memories. I still find glaze dots on my apron sometimes from that evening. Moments like these are why I bake.
Choosing the Best Lemon
Getting lemons at their peak ripeness is a game changer. I look for lemons with smooth skin and a lively scent, because those are the juiciest and zestier. If you want even more zest, rub the lemon lightly before grating—it releases the oils and makes zest easier to collect. Meyer lemons work beautifully for a slightly sweeter touch. Every batch tastes different depending on the lemon picked.
Glaze Troubleshooting for Perfect Cookies
One rainy afternoon, my glaze turned runny and slid right off the cookies — adding too much milk is a common slip-up. It helps to blend the powdered sugar carefully and start with less liquid, then add more drop by drop. If the glaze gets grainy, whisk it longer or sift again. Always color the glaze before checking thickness, since food coloring dilutes the mixture. Letting the glaze set for at least 20 minutes makes the colors pop.
Playful Decorating Ideas
Decorating these cookies is half the fun, and each batch brings out creative twists. Sometimes I sprinkle pastel jimmies over the glaze for a festive sparkle, or use edible flowers for extra flair. You can swirl two colors for a watercolor look or dip only half the cookie for a trendy effect.
- Keep the decorations simple for best flavor.
- Always let the glaze set before stacking or packaging.
- Try different shapes for the cookies if you want to shake things up.
 Pin it
 These lemon sugar cookies have become my hallmark for spring, and sharing them always brings smiles. I hope your batch turns out as bright and cheery as mine — happy baking!
Recipe FAQs
- → How do I achieve a vibrant pastel glaze?
Use pastel food coloring and mix into the glaze after combining powdered sugar, milk, and lemon juice. Tint each batch separately for different colors.
- → Can I add more lemon flavor?
For extra lemon taste, add a few drops of lemon extract to the glaze or increase the lemon zest in the cookie dough.
- → How should I store the cookies?
Keep the cookies in an airtight container at room temperature for up to four days to maintain their freshness and texture.
- → What tools are necessary for preparation?
An electric mixer, mixing bowls, measuring cups, parchment paper, baking sheets, and a wire rack are helpful for optimal results.
- → Are there dietary or allergen concerns?
This dessert contains wheat, egg, and dairy. Always check ingredient labels if serving someone with food allergies.
- → Is decoration optional?
Absolutely. Decorate with sprinkles or edible flowers for added festive flair, or keep it simple with just the pastel glaze.